Read from a forum about the basic of a planted tank, found it very interesting so i decided to share it here in my blog.
It describe a planted tank as a car.
Low tech tank = Gokart,
Normal tank = a saloon car,
High tech tank = Race car.
All cars need engine, fuel and accessories. In a planted tank concept, engine refers to lightings, fuel refers to CO2 and accessories refers to fertilizers.
Light is 1 of the 3 main factors that determine plants growth. It allows plants to carry out a chemical process called photosynthesis whereby plants take in CO2 (fuel) and fertilizers (accessories) and give out oxygen as by product.
CO2 is 1 of the thing needed for a plant to grow. Plants "breathe" in CO2 during photosynthesis and give out oxygen. This process stop when light is not available and plants start to give out a small amount of CO2. Amount of CO2 needed will be depending on the amount of lights received, the stronger the lights in terms of watts per gallon (WPG) the more CO2 is needed.
Fertilizers needed by a plant are Nitrates, Potassium, Iron, Phosphates, Calcium and many more which we term as trace elements. 1 very important benefit of having plants in a tank is they will consume nitrate in the water which is what we are trying to keep check for healthy livestock via water change and careful monitoring. So with higher lights (WPG) and more CO2, fertilizers will be used up at a faster rate and hence dosing will be required.
Gokart needs a small engine with little fuel and accessories. Meaning to say, in a planted tank concept. A low tech tank requires little lights with hardly any CO2 except those that's dissolved as air in the water and those given out by livestocks in the tank. There's no need for fertilizers dosing as it requires very little of it, a main source of it's fertilizers are fish food and waste produce by livestocks.
Race car requires a very powerful engine with premium graded fuel and fanciful accessories. Powerful lightings, alot of CO2 produced by a pressuirsed tank and a wide range of elements.
Saloon car will be in between Gokart and Race car.
Algae in Freshwater Planted Aquariums
This is what creates algae sweet spot: Plants require all three of their needs to be met. If one of the needs is not met, then the plants slow growth. Algae, however, are able to pick up one or two of those 3 needed items – light, co2, fertilizers - and grow without needing the balance of the 3.
Hair algae, Thread Algae, Black Brush Algae, Staghorn, Cladophora, and many, many others, will grow very well in a tank that has a lot of light and doesn’t balance the other needs. They will grow because their needs are being met with the “excess” of light, co2, nutrients, whatever the plants cannot use if the tank is out of balance.
The point is to understand that balance is important.
Tuesday, 2 September 2008

Monday, 18 February 2008
My Plant Tank
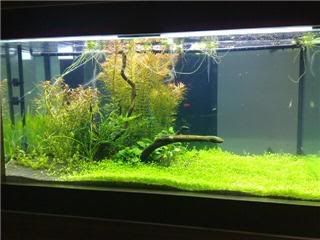 7 weeks later, the glossostigma has completely covered the foreground and is now spreading to the rest of the uncovered ground. Vallis doesn't seems to grow tall, might be due to strong lights. "Hong Tai Yang" shreds off all it's emmerged form leaves and turning red at the top due to strong lights. FE (iron) seems to be a little low as the leaves always turn back to green after some times.
Currently, there's 10 cherries shrimps, 2 mountain shrimps, 20 galaxy, 3 clown killies ( 2 adult and 1 baby), 2 ballon mory, 1 oto, 1 dawrf puffer, 4 chocolate guoromi and PLENTY of snails.
Casulties: 6 clown killies, 1 oto and 10 cherries shrimps (due to iron dosing).
Birth rate: 1 clown killie and countless snails.
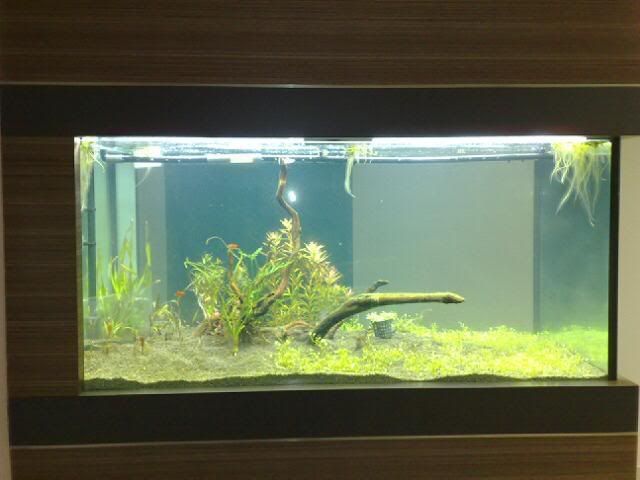
After 3rd week, this is how it turns out to be. This is after 3 water change as there's a high level of nitrate in brand new ADA substrate which might results in alage bloom. A film of protein was noticed on top of the water surface, always happen when the filter is new and a still water surface. This problem will goes off automatically when the Benificial Baterial (BB) starts building up. To speed up this process, bottled baterial can be dosed to the tank weekly.
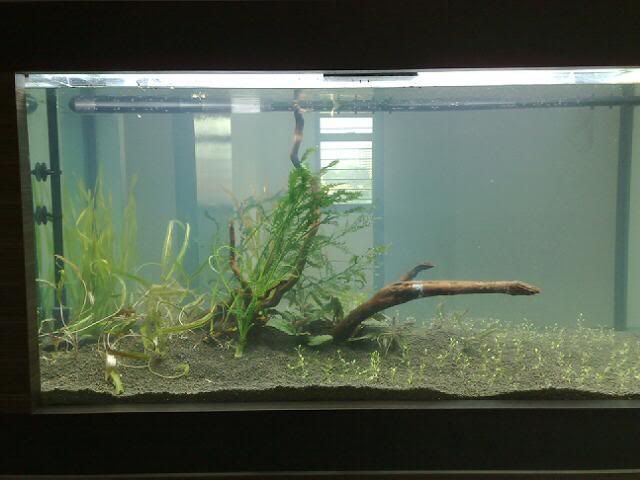
After a few hours of planting and arranging of plants. This is how it looks like on the FIRST DAY. I'm trying to achieve a traiangle form for this scape. To ensure proper water circulation, a rain bar is attached to the tank glass reinforcement on top which runs the entire length.
Tank spec: 4 feet x 2 feet x 2 feet
Temp: 28 deg
PH: 6
Fert regime: weekly
Water change : weekly for the first month, 3 week once after that.
Wednesday, 13 February 2008
Lights
Extract some information from a forum explaining in depth of lights used for planted tank.
| Lighting for the Planted Tank |
There are a lot of options available for lighting the planted tank. That”s the good news. The bad news is that it can be very confusing to sort through them all and decide what will work best in any particular application.
The best place to start is by considering the following parameters that are important when choosing lights for a planted tank.
- Intensity of light is more important than spectrum
- Aquatic plants use light in the red and blue areas of the spectrum most efficiently. They are less efficient at using green and yellow light, but they are also capable of using even this part of the spectrum as long as the intensity is adequate.
- Red light encourages long, “leggy” growth, while blue light encourages compact, “bushy” growth.
- Algae is much better at using poor-quality light than higher plants are, so strong light in the wrong spectrum can encourage algae problems, particularly in a tank with nutrient imbalances of one sort or another.
I think it’s safe to say that here in the U.S. the majority of people use fluorescent lighting on their freshwater aquariums. Other types of lighting occasionally seen are incandescent, mercury vapor and, more and more often, metal halides. As a very general rule of thumb — with the exception of incandescent lighting, where much higher wattages are needed to produce the same amount of light — plan on using about of 2 to 3 watts per gallon for good growth in a planted tank up to about 20 inches deep. More light may be necessary for a deeper tank.
Recently, in the typical American thinking of “more is better,” I’ve come across people using upwards of 5 watts per gallon on their planted tanks. While it is possible to manage such a system, it is more work. I have yet to meet a “high intensity” plant that could not be grown well in a tank of normal depth at around 3 watts per gallon. If the plant is not growing at 3 watts per gallon, look to other causes for the failure first.
Incandescent
Incandescent light is not particularly suitable for aquarium use. These bulbs put out a much higher percentage of heat to light than other types of lighting. They are expensive to run, burn out quickly and tend toward the red end of the spectrum — which, as we’ve discussed, produces leggy, spindly growth in aquarium plants.
Mercury Vapor
Mercury vapor lamps, from what I understand, are a viable option for aquarium lighting in Europe, but the proper spectrum bulbs have not been made readily available on the U.S. market. For this reason, I have little experience with them.
Metal Halide
Metal halide lighting is a very popular choice with reef tank owners. These lamps give off a tremendous amount of light. While they do get much hotter to the touch than fluorescent tubes, they are putting out a lot more light at the same time. The percentage of light to heat is actually a little better than the same wattage of normal output fluorescent bulbs.
Metal halides are certainly a viable option for a planted tank, and are the lighting of choice for those who want an open topped tank or for those with very tall or oddly shaped tanks. As a point source type of lighting, they have one strong advantage over all fluorescents — they catch and reflect any slight movement of the water surface. This gives a sparkly, sun dappled effect to the tank that is remarkably similar to a body of water lit by natural sunlight.
The heat for metal halides can be handled in one of two ways. If an open topped tank is desired, the lamps can be suspended pendant-style over the tank. If you prefer a closed tank, they can be mounted inside a hood, with small fans and ventilation openings to prevent a buildup of heat. In either case, the ballasts are heavy, and produce heat, so they should be mounted somewhere off of the tank.
Metal halides are available in a wide range of Kelvin (K) ratings. While to some extent the brilliance of these lamps offsets deficiencies in spectrum, most aquatic gardeners prefer those with a rating in the vicinity of 5000 to 6500 K. This is a color that closely mimics natural midday sunlight. There is also a range of wattage sizes available. Be sure to purchase the lamps that are best suited to the size of your tank — both in terms of wattage and the area that must be lit — because metal halides are much more “focused” light than fluorescents. For instance, over a 4-foot long tank, two evenly spaced smaller bulbs will give much more even lighting than a single, larger wattage bulb suspended over the middle of the tank.
Metal halides can be expensive to purchase initially, especially if you buy new fixtures meant for the aquarium trade. If you are handy, however, used fixtures are often available at a much lower cost, and can be retrofitted for aquarium use. The initial expense of metal halides can, to some extent, be recouped because of the fairly long useable life of the bulbs. From an electricity standpoint, for the amount of light they produce they are equivalent or cheaper to run than other forms of lighting.
The fluorescent tube has become the aquarium industry “standard.” Unfortunately, the single tube that comes with the average aquarium is not adequate for a planted tank. But, by adding strip lights to the top of your tank or by building a custom hood to hold multiple tubes, fluorescents can give you very adequate lighting.
High Output and Very High Output Fluorescents
Some people choose to use high output (HO) or very high output (VHO) fluorescents, and these can give lighting that rivals metal halides in intensity. These tubes give out more light in the same amount of space than normal output tubes, so they can be very useful on moderately deep tanks with limited surface area. They must be run on special ballasts for full efficiency and use special end caps as well. Initial and replacement costs for tubes can be high, and the tubes degrade quite quickly. In terms of efficiency, they are similar to normal output fluorescents, and slightly less efficient than metal halides and energy efficient T-8 fluorescents.
Normal Output T-12 Fluorescents
I look for several things in a fluorescent tube for a planted tank. High lumen rating, full spectrum, a color temperature of between 5000 and 6500 K, a color rendering index (CRI) as high as possible and low cost. Very few tubes measure up in all areas.
Remember that the Kelvin rating does not indicate spectral distribution. It indicates the color of the light that a particular tube will appear to exhibit to the human eye. It has more to do with eye appeal than plant growth. Tubes between 5000 and 6500 K come the closest to natural midday sunlight. Ask to see a spectral distribution chart for any new tube you are considering. It should be shaped like an “M,” with a spike around 5000 K. If the middle of the “M” is shallow, it means they are filling in with light that humans find most attractive. That’s okay, but you want to make sure that both the red and blue parts of the spectrum are well represented, because these are the areas most needed for plant growth.
Next look at lumen output, as well as the drop off over the life of the tube. This is where there is often a big difference between cheaper tubes and more expensive ones. Only you can decide if you’ll save money by changing the tubes less often.
It is possible to “mix and match” tubes in multiple tube setups and have very good results. Some people who are not after optimal plant growth, or who run enough tubes that intensity makes up for any lack in spectral output, find that a combination of “warm white” and “cool white” is adequate. Most aquatic gardeners, however, prefer a full-spectrum tube or a combination of full-spectrum and “daylight” tubes. Actinic tubes are not a suitable spectrum for the planted tank. They tend to encourage algae growth more than higher plant growth. Tri-phosphor bulbs rate the best in all areas but price. Still, if your lighting is marginal, you’ll get better results from these tubes. Also, all fluorescent tubes have a longer life span and degrade less when run on an electronic ballast as opposed to the “tar” ballasts commonly found in shop lights and cheaper aquarium fixtures. You can also extend the life of your bulbs by properly ventilating your hood. Fluorescent tubes perform best if not allowed to overheat.
Whether you are using normal output, high output or very high output tubes, be sure to factor in the cost of changing tubes at least yearly. For top output and the most even lighting, the tubes should be changed every six months on a rotating schedule. In most situations changing tubes on a rotating schedule so that no tube is more than 12 months old is perfectly adequate.
Energy-efficient T-8 lighting
There is a new type of fluorescent lighting that has great potential for use in planted tanks. In fact, before too long, these lights will become the “standard” as higher energy efficiency requirements are imposed on the industry. These are energy-efficient T-8 tubes run on electronic ballasts. They are made with the same rare earth phosphors used in the best full-spectrum T-12 (normal) tubes.
I have been using only energy-efficient T-8 tubes for several years now. Here is a comparison between these lights and a standard 4-foot, two tube shop light (in both cases I am talking about a 5000 K, full-spectrum tube with a spectral curve similar to a Vitalite):
A standard shop light with two tubes uses 94 watts — 40 watts for each tube and 14 for the ballast. It produces 5000 lumens. Each tube (assuming Vitalites, one of the least expensive full-spectrum tubes) costs at least $13, and tubes fall off to about one-half the rated lumens by the one year mark.
A two-tube fixture (using GE’s SPX 50 T-8 tubes with an electronic ballast) runs at 60 watts (32 watts per tube and the ballast runs at 95 percent, which accounts for the additional 4 watts). It produces 6000 lumens. Each tube costs under $10. These tubes drop about 5 percent in lumens in the first 100 hours of operation, but the rated lumens are after that period. The drop off over the remaining life of the tube (average failure time is 20,000 hours) is only to about 80 percent.
It is fairly easy to retrofit a two-tube strip light with a new ballast, and the end caps are the same. The ballasts cost around $40 for a two-tube ballast, but you can also get ballasts for four tubes (a two-tube ballast will also run a single tube if you want).
The one catch to using this type of lighting is that it is available mainly for commercial applications. Even a year ago you couldn’t walk into Walmart or even Home Depot and expect to find them. Now I have heard reports form various areas of the country that these lights are even showing up in these home improvement-type stores. Depending on where you live, however, you may still have to go to a local lighting distributor who provides lighting to contractors for commercial installation. One web source that I know of is Grainger’s.
Regardless of the type of lighting you choose, there are also some guidelines for photoperiod that should be followed. Most of the plants used in aquariums are from tropical or subtropical areas of the world. These areas do not have the great variations in day length we experience in the temperate regions. For this reason, we should try to duplicate a tropical photoperiod of 10 to 14 hours of light daily. People using very strong lights, like metal halides, often find that the lower end of this light period is sufficient. Those with less bright lighting may want to use a longer period. However, in no case should the photoperiod be extended much beyond 14 hours. At this point, whether the lights are on or not, higher plants stop photosynthesizing efficiently, while algae is quite capable of carrying on.
Finally, there are a couple of simple ways to reduce light loss as much as possible. Make sure that your cover glass, if you use one, is kept spotlessly clean. Except in the case of suspended metal halide lighting, keep the lights as close to the surface of the water as practical. This goes in the other direction too. Keep the water level in the tank as high as possible too. If there is free glass showing above the water line, light “spills” out through that area, whereas light that hits the walls below the water level is bounced back into the tank.Sunday, 20 January 2008
The layout

A rough guide of how i want this aquascape to look like.
This tank is meant to be viewed from 3 sides.
Legend :
- Blue if the pipings, co2 reactor and accessories
- Dark green is Bolbitis heudelotii
- Light green is Blyxa japonica
- Red is some form of crypt
- Brown is the bogwood with pettie nana tied to it
- Enpty area will be japanese hairgrass.
Hardscape arrangement
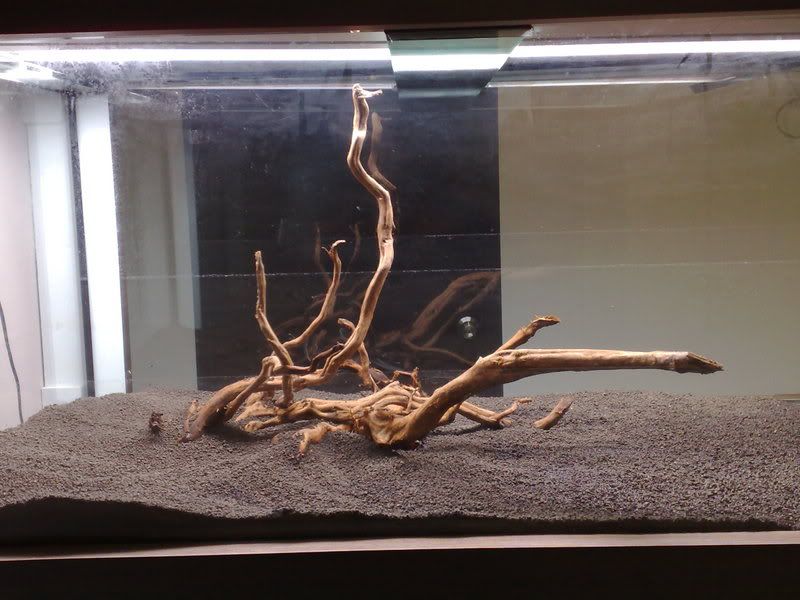
A sloping substrate with 3 inch at the highest point and 1 inch at the lowest point. It takes 6 packets of 9kg ADA to create this sloping effect.
Add in another matching BW buried both BWs partially to make them look like a single piece.
The plants i'm planning to have in my tank.
Hemianthus callitrichoides = moderate and medium light requirement
Microsorum pteropus v. 'narrow leaf' = easy and medium low light requirement
Glossostigma elatinoides = moderate and high light requirement
Bolbitis heudelotti = easy and low light requirement
Anubias barteri v. 'nana' = very easy and low light requirement
Pogostemon helferi = moderate and medium high light requirement
Cryptocoryne wendtii = very easy and low light requirement
This is to help me in deciding on the amount of lightings i will want to have in this tank. With high light requirement plant like glossostigma i need to go for high lightings. 2 x T5HO lights which is a total of 440 watt. This adds up to approx 4WPG.
Full height cabinet
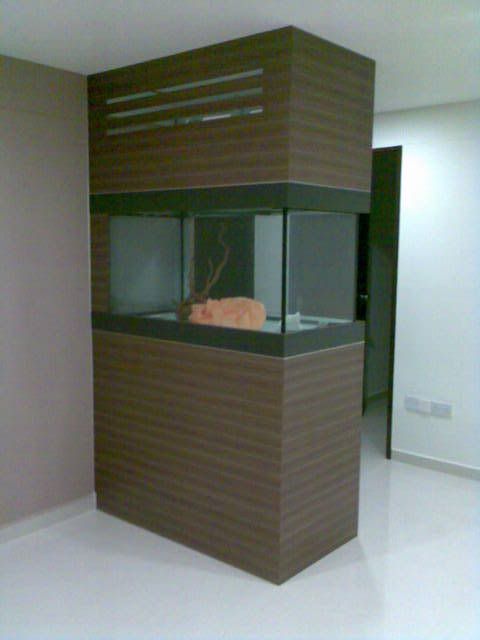
A custom made full height cabinet to house the planted tank. This set me back by almost 900 SGD
Lesson learnt:
- The ventilation slots are too big.
- Should cover another 1 inch of the top of the tank in order not to expose the water line.
- Ventilation slot should be build for the lower cabinet for future upgrade to chiller.
- The left hand side of the tank facing the wall should be pasted with oyama black paper to prevent exposing of wirings and hoses.
Hardscape : Bogwood
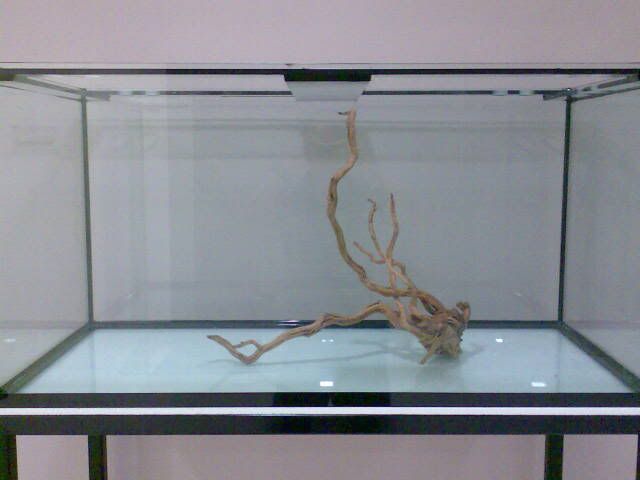
Plan for this planted tank is to have bogwood as it's focus point.
Finally found this piece of BW at a LFS after several weeks of searching. But this piece of BW is kinda bare.
Cost: 18 SGD
My 4 feet tank journal
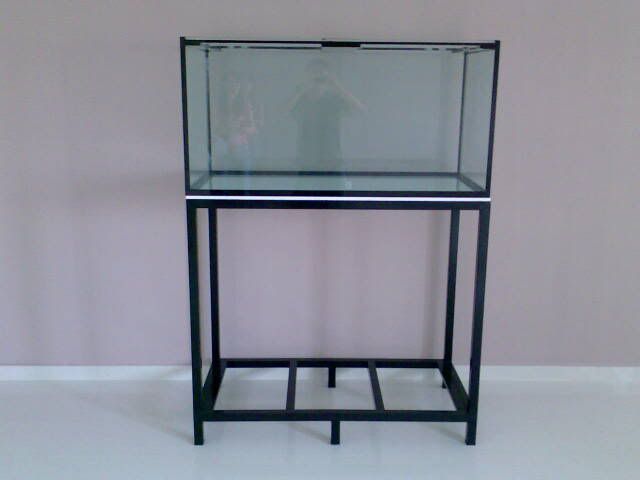 Custom made this tank and it's stand.
Measurement: Tank: 4 feet x 2 feet x 2 feet
Stand: 3.5 feet tall
Aim is to get the tank to level with my line of sight . It's too high for initial planting as well as maintaining of those shorter plants.
Tank capacity: approx 430 Litres
Cost: 450 SGD
Saturday, 29 December 2007
Yamato Shrimp Breeding
An article extracted from Shrimp Now forum on how to breed yamatos.
In nature Amano’s live in coastal area in freshwater lakes. The lakes where they live have a connection with the sea trough a river. When the eggs are ready to hatch, the pregnant shrimp swims to the beginning of the river and that’s the place where the eggs will hatch..
The larva of the Amano shrimp flow with the river to the mouth of the river, where the water is brackish/ salt, because of the connection with the sea.
The larva will grow-up in the sea or the mouth of the river. The larva has a couple of different stages when growing. After about 25 days or so the larva turns in to shrimplets.
The little shrimplets have to get strength by eating algae for another 20 days. Then they are strong enough to swim into the river and return to the freshwater lake to become an adult shrimp.
How do you start...
You start with the right material....
• A 54 liter tank (about 14 gallon). Not smaller. This because the female get over 1000 larva and with a smaller tank the water doesn’t stay in balance. (No filtering!)
• A 20/30 liter tank. Freshwater. Just a normal tank to place the Amano shrimplets in when the can go from salt to sweet water. Add some plants, etc... This tank must have filtering.
• The tank need lamps...
• A hiding place for the pregnant female. For instance a piece of a broken flowerpot
• A plastic decoration plant. Real plants could have some effect on the balance of the water.
• Air pump
• 8 mm air hose, 2 pieces about 1 meter.
• Piece of lead to wrap around the hose.
• Artemia sif
• pipet
• granule food small sized
• Liquizell (a liquid starter feed) it’s made by Hobby.
• Spirulina (powder or tablets)( 100% natural).
• Sea salt, for instance from Tropical Marine. Other brands can be used, but this is the brand witch is used by the inventor of this breeding method. You need about 3 kg.
• A pregnant female...
Preparing the tank for the female
put the empty tank at a place where it’s as dark as possible.. No direct sunlight!!
Get some water of the tank where your Amano’s living in, and fill the breeding tank for 50%. Fill in the rest of the tank with clean water.
Put the plastic plant and the hiding place at the bottom of the tank. Make sure it stays there.
The lamps must be burning from 11:00 till 23:00
The water has to be about 22 degrees Celsius
Wrap the little piece of lead around the end of the hose so that the end of the hose stays at the bottom of the tank. Connect the hose to the air pump and put the hose on the bottom of the tank, in the middle. The airflow must not be too soft. Look when adjusting the speed. You have to see the bubbles about ½ second apart from each other.
There is no filtering of the water, because the larva could get sucked in to the filter.
This tank has to run like this for about 3 weeks.. Do not remove the algae when growing.. That’s food for the female and for the larva.
AFTER 3 WEEKS WAITING...
The tank is ready now for a pregnant female. Find a female that is pregnant for a couple of days, not longer then a week. You can see that because the eggs are dark brown/olive green. When the eggs are light green/ gray the female is pregnant for over a week. The risk of hatching to early is very big then... So be patience and wait until you see a female with ‘fresh’ eggs.
The pregnant female goes in the prepared tank. You have to wait now for 4 or 5 weeks till hatching..
You can feed the female every 3 or 4 days with 2 or 3 grains of granule food. When the granule is molding, feed less.
When you are waiting for the eggs to hatch, start to set up the tank for the shrimplets. When the shrimplets are full grown and ready to go to freshwater again the tank is ready to use! Nicely run in for a couple of weeks...
EGGS JUST HATCHED...
DAY 1.
When the eggs hatched the water of the tank will be full with little white larva. They look like little commas and there are about 1000 of them... It looks like soda with bubbles.
Remove the female, plant and hiding place...You can do this with big tweezers for instance or just by hand.. The larva are strong so don’t worry.
The larva can survive in freshwater for about 4 days.. So the water must become salt now.. The method seems a bit drastic, but it works very good.. It doesn’t do any harm to the larva.
The rate of salt and water is... 25 grams seasalt at 1 liter water. So if there is 54 liters water in the tank, you have to put in 1350 grams sea salt.
Take the salt and gently put it into the tank where the larva are in and stir a little with a (plastic) spoon till the salt is dissolved. The water could become a little white, but that disappears after some days.
Then feed 15 drips of Liquizell.
When the lamps are on the larva swim to the top of the water, because they are phototactic. When the lamps go out the larva will go to the corner of the tank towards the (day)light.
DAY 2.
When everything is all right, the larva swim to the top (the light) when the lamps of the tank goes on, and after a while they drift a bit in the middle of the tank, or just above.
When most of the larva is swimming curved with head down, it’s going all right. When they lay on their sides on the bottom or drifting that way at the top, it’s not good.
The water must be less white then yesterday and you don’t have to feed.
DAY 3.
The water just should be clear now.
When the light goes on, feed 10 drips of Liquizell.
Day 4.
A rest day. When you look at the larva you maybe can see that they grow a little..
Day 5.
Today you have to feed Spirulina. Take the powder ( when isn’t powder yet, crush it) and mix it with water till you have a dark green juice. Adjust 30 drips of the juice in the water with a pipet.
Day 6.
Rest day. Some of the larva can feed on the algae on the windows..
Day 7.
A week has past... you should see some growth now. If the larva did not grow at all the change of them becoming shrimp is very small. They will die in the next week or so.
Day 8.
Feed 20 drips of Liquizell
Day 9.
Rest day
Day 10.
Feed 15 drips of Liquizell
Day 11.
Rest day. When you look very close you see some change of the larva. Some of the larva has a sort of a little trunk at the end of their tails.. That’s discharge. It’s a sign that the larva is feeding very good, and that their digestion is all right.
Dag 12.
Rest day. The water is turning a bit green. The larva is swimming powerfully in curved position.
Day 13.
Feed 30 drips of Spirulina juice
Day 14.
Rest day. You should see that the larva turns brown/reddish...
Day 15.
Water change.. 1/3 of the water must be changed today.
Take two 10 liter buckets, 8 mm hose and the Artemia sif.
The best time is to change the water when the lights are off, because the larva are at the bottom of the tank then.
Put the sif in a corner of the tank so that you can suck out the water through the sif. Do not use a hose with bigger diameters, because the stream is to strong for the larva and you’ll harm them.
Suck out the water with the hose, through the sif. So no larva can get in to the hose.
It takes some time, but it’s for the better...
Don’t forget to add the salt to the clean water. 25 grams a liter. 250 grams a bucket.
Put the salt in the bucket, dissolve it and then put it in the tank.
Add 20 drips Liquizell to the tank.
Day 16.
Rest day
Day 17.
Rest day. The larva will stay in the lower parts of the water..
Day 18.
Feed 30 drips of Spirulina juice. However, when the water is very green, don’t feed.
Day 19.
Rest day
Day 20.
Rest day. When you look at the larva, some of them flash through the water for a second.
Day 21.
When the water is clear you can feed 20 drips of Liquizell.
Day 22 + 23.
Rest day
Day 24.
When the water is clear feed 15 drips of Spirulina juice.
Day 25.
Rest day.
When you look close you should see the first shrimplets!!! Mostly the sit in the corners of the tank, or at the bottom, feeding on the algae.
Day 26.
If the water is clear feed 15 drips Liquizell. This is the last feed...
Day 27.
Rest day.
Day 28.
Water change. You must do it just like day 15.
Day 29 – 32
Rest day
Day 33.
At this point there should not be any larva anymore.. The entire batch of larva become shrimplets.
Day 34 – 43.
Rest day
Day 44.
Big Day!! The shrimplets can go to the freshwater tank now!!
You can catch them and directly put them in freshwater. When you want to be careful you can do the next thing.
Take 50% of the saltwater out of the tank and replace it with freshwater from the freshwater tank where you’re going to take them. After an hour you can catch them and place them in freshwater...
The shrimplets can be fed with granule or special shrimp food..
If the shrimps stay alive until they are adult Amanos, your breeding was successful!!
This breeding method is translated with permission by the editor of a German site. The site is www.caridinajaponica.de. The method they use for breeding Amano’s is developed by Logemann.
Feel free to experiment with this method and share your success story.
In nature Amano’s live in coastal area in freshwater lakes. The lakes where they live have a connection with the sea trough a river. When the eggs are ready to hatch, the pregnant shrimp swims to the beginning of the river and that’s the place where the eggs will hatch..
The larva of the Amano shrimp flow with the river to the mouth of the river, where the water is brackish/ salt, because of the connection with the sea.
The larva will grow-up in the sea or the mouth of the river. The larva has a couple of different stages when growing. After about 25 days or so the larva turns in to shrimplets.
The little shrimplets have to get strength by eating algae for another 20 days. Then they are strong enough to swim into the river and return to the freshwater lake to become an adult shrimp.
How do you start...
You start with the right material....
• A 54 liter tank (about 14 gallon). Not smaller. This because the female get over 1000 larva and with a smaller tank the water doesn’t stay in balance. (No filtering!)
• A 20/30 liter tank. Freshwater. Just a normal tank to place the Amano shrimplets in when the can go from salt to sweet water. Add some plants, etc... This tank must have filtering.
• The tank need lamps...
• A hiding place for the pregnant female. For instance a piece of a broken flowerpot
• A plastic decoration plant. Real plants could have some effect on the balance of the water.
• Air pump
• 8 mm air hose, 2 pieces about 1 meter.
• Piece of lead to wrap around the hose.
• Artemia sif
• pipet
• granule food small sized
• Liquizell (a liquid starter feed) it’s made by Hobby.
• Spirulina (powder or tablets)( 100% natural).
• Sea salt, for instance from Tropical Marine. Other brands can be used, but this is the brand witch is used by the inventor of this breeding method. You need about 3 kg.
• A pregnant female...
Preparing the tank for the female
put the empty tank at a place where it’s as dark as possible.. No direct sunlight!!
Get some water of the tank where your Amano’s living in, and fill the breeding tank for 50%. Fill in the rest of the tank with clean water.
Put the plastic plant and the hiding place at the bottom of the tank. Make sure it stays there.
The lamps must be burning from 11:00 till 23:00
The water has to be about 22 degrees Celsius
Wrap the little piece of lead around the end of the hose so that the end of the hose stays at the bottom of the tank. Connect the hose to the air pump and put the hose on the bottom of the tank, in the middle. The airflow must not be too soft. Look when adjusting the speed. You have to see the bubbles about ½ second apart from each other.
There is no filtering of the water, because the larva could get sucked in to the filter.
This tank has to run like this for about 3 weeks.. Do not remove the algae when growing.. That’s food for the female and for the larva.
AFTER 3 WEEKS WAITING...
The tank is ready now for a pregnant female. Find a female that is pregnant for a couple of days, not longer then a week. You can see that because the eggs are dark brown/olive green. When the eggs are light green/ gray the female is pregnant for over a week. The risk of hatching to early is very big then... So be patience and wait until you see a female with ‘fresh’ eggs.
The pregnant female goes in the prepared tank. You have to wait now for 4 or 5 weeks till hatching..
You can feed the female every 3 or 4 days with 2 or 3 grains of granule food. When the granule is molding, feed less.
When you are waiting for the eggs to hatch, start to set up the tank for the shrimplets. When the shrimplets are full grown and ready to go to freshwater again the tank is ready to use! Nicely run in for a couple of weeks...
EGGS JUST HATCHED...
DAY 1.
When the eggs hatched the water of the tank will be full with little white larva. They look like little commas and there are about 1000 of them... It looks like soda with bubbles.
Remove the female, plant and hiding place...You can do this with big tweezers for instance or just by hand.. The larva are strong so don’t worry.
The larva can survive in freshwater for about 4 days.. So the water must become salt now.. The method seems a bit drastic, but it works very good.. It doesn’t do any harm to the larva.
The rate of salt and water is... 25 grams seasalt at 1 liter water. So if there is 54 liters water in the tank, you have to put in 1350 grams sea salt.
Take the salt and gently put it into the tank where the larva are in and stir a little with a (plastic) spoon till the salt is dissolved. The water could become a little white, but that disappears after some days.
Then feed 15 drips of Liquizell.
When the lamps are on the larva swim to the top of the water, because they are phototactic. When the lamps go out the larva will go to the corner of the tank towards the (day)light.
DAY 2.
When everything is all right, the larva swim to the top (the light) when the lamps of the tank goes on, and after a while they drift a bit in the middle of the tank, or just above.
When most of the larva is swimming curved with head down, it’s going all right. When they lay on their sides on the bottom or drifting that way at the top, it’s not good.
The water must be less white then yesterday and you don’t have to feed.
DAY 3.
The water just should be clear now.
When the light goes on, feed 10 drips of Liquizell.
Day 4.
A rest day. When you look at the larva you maybe can see that they grow a little..
Day 5.
Today you have to feed Spirulina. Take the powder ( when isn’t powder yet, crush it) and mix it with water till you have a dark green juice. Adjust 30 drips of the juice in the water with a pipet.
Day 6.
Rest day. Some of the larva can feed on the algae on the windows..
Day 7.
A week has past... you should see some growth now. If the larva did not grow at all the change of them becoming shrimp is very small. They will die in the next week or so.
Day 8.
Feed 20 drips of Liquizell
Day 9.
Rest day
Day 10.
Feed 15 drips of Liquizell
Day 11.
Rest day. When you look very close you see some change of the larva. Some of the larva has a sort of a little trunk at the end of their tails.. That’s discharge. It’s a sign that the larva is feeding very good, and that their digestion is all right.
Dag 12.
Rest day. The water is turning a bit green. The larva is swimming powerfully in curved position.
Day 13.
Feed 30 drips of Spirulina juice
Day 14.
Rest day. You should see that the larva turns brown/reddish...
Day 15.
Water change.. 1/3 of the water must be changed today.
Take two 10 liter buckets, 8 mm hose and the Artemia sif.
The best time is to change the water when the lights are off, because the larva are at the bottom of the tank then.
Put the sif in a corner of the tank so that you can suck out the water through the sif. Do not use a hose with bigger diameters, because the stream is to strong for the larva and you’ll harm them.
Suck out the water with the hose, through the sif. So no larva can get in to the hose.
It takes some time, but it’s for the better...
Don’t forget to add the salt to the clean water. 25 grams a liter. 250 grams a bucket.
Put the salt in the bucket, dissolve it and then put it in the tank.
Add 20 drips Liquizell to the tank.
Day 16.
Rest day
Day 17.
Rest day. The larva will stay in the lower parts of the water..
Day 18.
Feed 30 drips of Spirulina juice. However, when the water is very green, don’t feed.
Day 19.
Rest day
Day 20.
Rest day. When you look at the larva, some of them flash through the water for a second.
Day 21.
When the water is clear you can feed 20 drips of Liquizell.
Day 22 + 23.
Rest day
Day 24.
When the water is clear feed 15 drips of Spirulina juice.
Day 25.
Rest day.
When you look close you should see the first shrimplets!!! Mostly the sit in the corners of the tank, or at the bottom, feeding on the algae.
Day 26.
If the water is clear feed 15 drips Liquizell. This is the last feed...
Day 27.
Rest day.
Day 28.
Water change. You must do it just like day 15.
Day 29 – 32
Rest day
Day 33.
At this point there should not be any larva anymore.. The entire batch of larva become shrimplets.
Day 34 – 43.
Rest day
Day 44.
Big Day!! The shrimplets can go to the freshwater tank now!!
You can catch them and directly put them in freshwater. When you want to be careful you can do the next thing.
Take 50% of the saltwater out of the tank and replace it with freshwater from the freshwater tank where you’re going to take them. After an hour you can catch them and place them in freshwater...
The shrimplets can be fed with granule or special shrimp food..
If the shrimps stay alive until they are adult Amanos, your breeding was successful!!
This breeding method is translated with permission by the editor of a German site. The site is www.caridinajaponica.de. The method they use for breeding Amano’s is developed by Logemann.
Feel free to experiment with this method and share your success story.
Yamato Shrimp
 Another creature that's very effective against algae.
It's know as the Yamato shrimp (Caridina japonica).
This shrimp was introduced to the aquarium hobby in 1983 by Takashi Amano. It is for this reason that this species is often referred to as the Amano shrimp.
Yamato shrimp grow to a maximum adult size of 2" head to tail. Although very tolerant of salinity and pH ranges (down to 6.0), they are very sensitive to ammonia/ammonium and heavy metal concentrations. Temperature has to be kept below 30C because they are not a tropical species.
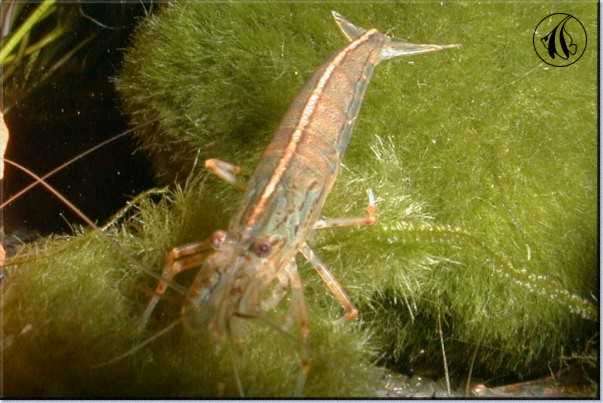
One of the most distinguishing traits of the Yamato shrimp is that it is much more attractively colored than the other varieties. Their bodies are light brown to opaque with a tan stripe down their back. Additional series of broken reddish-brown lines run down their sides. They will also have two dark spots on their tail, one in each rear corner. Of additional importance to aquarists is the fact that they do not possess the large claws of some of the other shrimp species and they are purportedly longer lived.
The real attraction of these shrimp is their avowed success in algae consumption, especially soft algaes. They are also rumored to eat red algaes in the absence of other foods. However, like most captive inverts they will choose fish food over algae any day and often will turn on soft leafed plants in the absence of softer algae types or fish foods. They will not eat Black Brush Alage , nor can they get rid of spot algae on tank surfaces.
Friday, 28 December 2007
Otocinclus

Introducing one of the algae control creature... Otocinclus.
Like it or not, algae will definately be in a planted tank. Creatures like oto will be needed to remove excess algae to make the tank looks algae free.
Common names: Otocinclus, Otto, Oto, Pygmy Suckermouth Catfish, Dwarf Sucker
Scientific/Latin name: Otocinclus affinus (other similar species exist, like O. vittatus and O. vestitus)
Maximum length: 1 to 2 inches
Colors: Natural, black
Temperature preference: 70 to 80 degrees F
pH preference: 6 to 7
Hardness preference: Soft to moderate
Salinity preference: Low
Compatibility: Excellent (may suck on large fish like discus and goldfish)
Life span: Unknown, maybe 3 to 10 years
Ease of keeping: Moderate
Ease of breeding: Moderate to difficult
Dwarf Puffer

Enough of the woods, stones and plants. Let's talk about some of the fishes i will keep inside my planted tank.
Dwarf puffer (Carinotetraodon travancoricus) is definately something i must have in my planted tank for snail control.
The Dwarf Puffer is, as hinted by its name, the smallest of the puffer family. It is an entirely freshwater fish, breeding, maturing and living out its days in a fresh tropical environment.
1. Dwarf puffers live entirely in fresh water. This is perhaps the most important thing to know, as many aquarists are under the impression that all puffers are either marine or brackish. While it is true that a dwarf puffer will survive in brackish water, its life span will be significantly reduced, and the fish will lead an unhealthy life.
2. Dwarf puffers are one of the most aggressive of puffer species. They will attack fish many times their own size, and often win. Dwarf puffers really should only be kept in a species only tank, and if you insist on keeping more than one, then each puffer will require at least five gallons (20 liters) each.
3. Dwarf puffers are territorial. They will claim areas of the tank as their own, and attack tank mates. A setup for dwarf puffers will need a lot of dense plants and plenty of caves or pots so that each puffer can define their territories around the hiding places, and will not live in constant view of other puffers.
4. Dwarf puffers are difficult to breed. Considering the fact that a male dwarf puffer will see any fish, including female dwarf puffers as a threat.
5. Dwarf puffers live in communities when juvenile, but this changes rapidly as the fish mature. This behavior is often mistaken for compatibility with other fish of their own species. While it is true that you will have more success if you keep several puffers together that have grown to maturity in each others company, attempting to introduce an adult dwarf puffer into a community or species tank will be disastrous.
6. Dwarf puffers have no scales, and as such their skin is sensitive, and easily wounded. Many puffers bury themselves in sand, but because dwarf puffers are so small, even the grains of sand are likely to cause injury. A dwarf puffer setup will require a sand substrate, preferably a dark sand substrate; otherwise your puffers will cut themselves to shreds.
7. Dwarf puffers are difficult to sex at an early age, but when mature, they are much easier to distinguish. Dominant males will typically have a dark stripe running all the way from under their mouths, across the belly, to the tail. It looks a little like a goatee beard when viewed from the front. All males, dominant or not, will have wrinkles behind their eyes, although these can be difficult to see. Female puffers lack both of these marks and all dwarf puffers have a mottled green skin with light brown patches. Their colours will fade when under threat from other puffers or when stressed, and their colours will darken drastically when they are very ill, highly stressed or in the middle of a fight.
8. Dwarf puffers are notoriously difficult to persuade to eat frozen foods. They will only usually eat live foods, such as artemia or bloodworms. However, they can be fooled into thinking good quality frozen bloodworms are still alive if there is a large current in the tank. Use this to your advantage when tricking them into thinking that their bloodworms are still alive.
9. Dwarf puffers puff. There is a rule for all puffers: never let them puff air. If a dwarf puffer inflates itself with air, then its outlook is bleak. Because of the pressure of the water around it, the valves in the puffers' inflation system are usually sealed shut, so once it is full of air, it is usually doomed. When moving dwarf puffers, use a net to catch them and hold them under water, and then use a drinking glass or mug to catch it. Make sure it is under water at all times. Make sure to have a heavy book handy. Even though inhaling air is deadly to them, they love to jump out of tight spaces.
10. Dwarf puffers are, without doubt, among the most feature rich in personality traits of all fish. As such, they are often found zooming around the front of the tank whenever their owner is near. They will come to recognize you as their owner, and will learn when they are about to be fed. Do not be surprised to find your dwarf puffer puffing itself up in protest to not being fed! If this ever happens, the best thing to do is to feed them a little and quickly, so they will deflate themselves and do themselves no harm or stress.
There is a lot more to know about these feisty little fishies. Their tolerance to change in pH and KH is incredibly low, and while they will survive happily in a range of water temperatures, even the slightest trace of nitrates or ammonia in the water may be enough to kill them. Their highly sensitive skin is to blame for this, as the pollutants in the water will move by osmosis far quicker into the dwarf puffers' system because of their lack of scales.
More Inspiration


More aquascape...
Aquascape is the term or word used for placing and grouping of stones, woods and plants together to form an art piece in water.


Subscribe to:
Posts (Atom)
